

Showing posts with label Hair. Show all posts
Showing posts with label Hair. Show all posts
February 01, 2016


June 05, 2014
Jennifer Morrison Inspired Hair Tutorial (Video Link) ♥
Hello Beautiful People,
Today i bring you a fabulously easy hair tutorial based on a style wor my Jennifer Morrison, as show below:
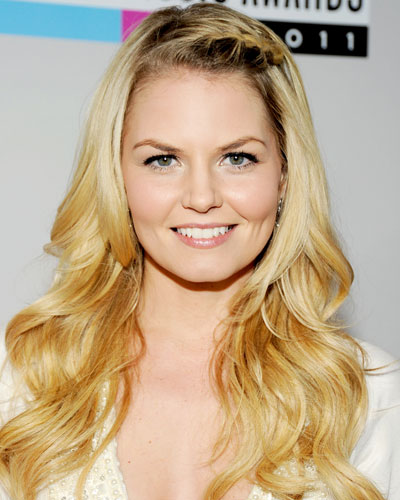
If you do not know who Jennifer Morrison is, she is the actress who plays the main character on my favorite tv show "Once Upon A Time". Most of her red carpet hair styles seem to include braids of some sort, which idicated a love for braids on either her's or her hairstylists side. None the less, the style really captured my attention for it's simplicity and how it almost has a medival feel to it. I have been obsessed with the romantic 14th century braids and updos. Braids add romance to anything. I filmed a super quick and basic tutorial for this look and I hope you enjoy!

May 03, 2014
Tips For Special Events ♥

Hello Beautiful People,
Today I am going to give you guys tips on getting ready for special events, but first let's take a moment to talk about how this is my 100th post!!!! Yaaaay! I have posted 100 times and wanted to take a moment to say thank you to all my loyal readers and subscribers. I love you all! :) Anyways on to the post...
December 04, 2013
Hair Products I Love ♥

Not to toot my own horn but I do get alot of people asking me how I keep my hair so healthy looking (when it's really not!) and what products I use to style. So, today I am going to share with you all some of my favorite products to style and keep my hair appearing healthy.
One of the biggest things when trying to keep your hair healthy is using a good shampoo. I usually like a shampoo with a slight (and I mean SLIGHT) moisturizing component. My favourite brand so far has got to be Biotera. This shampoo has several different lines for different hair needs. Right now I am using the Volumizing line and I really enjoy it. I also really like the smell of this product, it has a very clean and fresh smell. I personally can't stand shampoos that smell perfumed and heavy. This shampoo offers that light scent I am looking for.
Another component to hair that appears healthy looking is moisturizing. I like to use an oil based product on my ENDS ONLY! This helps to seal split ends and helps to nourish dry hair. My favourite one is the Mystic Divine Dry Oil Spray. This is a mixture of Argan Oil and Minoi Oil and offers moisture without being too preachy. Because it is a dry oil, it doesn't give your hair a greasy look and if applied to wet hair, the hair absorbs it nicely.
As far as styling goes, I like a good dry shampoo for my 'inbetween' days. Alot of people brush dry shampoo off because they believe it is a product that means they are skipping washes all together. WRONG! Dry shampoo is not intended to replace washing your hair. When used properly, Dry Shampoo can help prevent drying of the hair and fade of color. I use this on the third day. Because I have Black hair and color fades quickly I try to prolong my wash for 3 days. By the third day my bangs and roots look a little slick so I like to give them a shot of dry shampoo. My personal favourite is the Beyond the Zone Dry Shampoo for Medium to Dark hair. This one has a shot of pigment that helps to disguise roots and wont leave a white cast on dark hair.
A new found love for styling is my Volumax Sea Salt Spray. What is all the hype surrounding sea salt sprays? Well, think about how luscious mermaid hair is...with it's carefree waves and effortless volume. Well, that is what sea salt spray is. If you don't want mermaid hair...step away from the sea salt spray! I usually use this after twisting my hair around a wand a few times. I spray it in and grab handfuls and scrunch upwards. It creates effortless looking waves and smells great!
The final step in all hair styles is a good hairspray. My personal favourite is a The VitaE Brushable Hold hairspray. It holds great without the crunch! It even holds my styles for a few days. A good hairspray will give you a good hold without being to crunchy! The only time you want a helmet like hold is when you are setting an updo of some sort. For daily use, you don't need something that intense.
Anyways Loves, those are a few of my favorites! I won't include a lot of pics because these are guidelines for products, they don't necessarily only come from the brands mentioned. Use whatever you like for your needs and hair type! That being said, if you have any questions regarding any of the products I use, leave a comment below and I will try my best to get back to you. Also, tell me about some of YOUR Favourite products!
Thanks for taking the time to read guys!
Until Next Time...
Disclaimer: The opinions expressed are that of my own. I have never accepted money for my opinions. These are thoughts that of my own!
September 26, 2013
Tips Thursday: When good bangs go bad! How to hide botched bangs.
 Good Evening Beautiful People,
I know this post is super late and in all technicality, it isn't even Thursday anymore, but today was jam packed with so many things. I am just catching up on my Thursday night shows and then off to bed because I have to get up super early in the morning. I wanted to quickly give you a post so here I am.
So, I have a tendency to take to the scissors and razor to try and shape my own bangs. FYI...not as easy as you think. For those who have done this, they know what I mean. I usually get them shorter than I want but this time was the worst. I looked up a video and tried trimming. Let's just say, this is proof that youtube doesn't have answers for everything. Needless to say my bangs are super short and I need a way to camouflage them. So, for all you guys who have put your faith in tutorials that claim to be as simple as 1, 2, 3...here it is.
 Things You will Need
Hair Spray, Rat Tail Comb, bobby pins and small foam rollers
Make a Fake Bang Piece
 Sometimes you just need to cover it so, a good way is to get a fake bang piece. Some beauty supply stores sell them but if you have a pair of old extensions, then you can make your own.
Tips for pulling this off:
- Take a piece of extensions and measure from one side of the bang to the other. If you need to, re-position the clips
- Separate bangs into two sections and clip back the top section, tease bottom section and then clip piece onto bang
- Un-clip top half of hair and brush over extensions
- If the bangs need to be trimmed or shaped, do so while they are in the hair
 Head Bands
This works because you can push and hold the bangs out of the way.
Tips for pulling this off:
- Push head band over the bangs
- Pin or gel back bangs that are sticking out
- This style works best after using foam rollers to direct the hair backwards
 Pin Hair to the Side
This style has a very vintage feel and you can do this two ways, you can do a front faux suicide roll or a side roll.
Tips for pulling off the faux suicide roll:
- Use foam rollers to direct the bangs forward
- Make a 'U' shape by adding hair from the crown, you will need longer pieces
- Use a large curling iron to curl forward
- Tease the bangs and long pieces together
- Take hair and swoop it to either side
- When swooping, make sure they cradle or cover the short bangs
- Secure on side
- Use foam rollers to direct the bangs forward
- Make a 'U' shape by adding hair from the crown, you will need longer pieces
- Use a large curling iron to curl forward
- Tease bangs and long pieces together
- Take hair and begin to wrap it around your pointer finger and roll until you reach the scalp, pull to the side and secure with bobby pins
- Spray the hair with hair spray to set and secure

So that's it! Hope this helps all you bang hackers :) Thanks so much for reading everyone!!!

July 14, 2013
Summer-Proof Makeup & Hair Tips
Hey Beauties!
Hope y'all had a fabulous weekend and are ready to start a new week! My weekend was super dramatic as my car caught fire on the highway yesterday as I was on the way to the beach. Super maddening, saddening and so cry worthy it's not even funny. But as Liz Taylor would put it, "Pour yourself a drink, Put on some Lipstick, and Pull Yourself Together'. That is precisely what I plan on doing this week. I will be busing it for a while, which means I'm going to be standing in the hot sun waiting for my wheels to work. Ick! So, what I need is a summer hair and makeup survival guide but since no such thing exists I compiled a few things that may help myself, and my beautiful readers, not to melt like a Popsicle when you hit the summer air. I am going to start with some of my favorite sweat-proof makeup items and then move on the hair. Keep in mind that some of these products may not be budget friendly but they get the job done! I am a heavy face sweater and I need products that can handle the job. So, let's get started...
Let's start with a primer. The reason primers are good in the summer is because they create a barrier between your skin and your foundation. It also creates an adhesive that helps our your makeup stick better and helps it not to move out of place. So far my favorite primer is the Benefit Stay Flawless 15-hour Primer. The product is described as a makeup magnet. It creates a tacky surface to help your makeup to adhere and helps keep it from moving. This product really does stand up to the job. Although it would not personally say it lasts a whole 15-hours. But that is another story, for another time. I plan on writing a full review shortly.
Next up is a long-wearing foundation. I have oily skin so I need a product that wont slide off
when my face gets slick. I also need something light-weight that has good coverage. I have alot of hyper-pigmentation and acne scaring and I need something that will cover that so I don't need alot of heavy concealer. The more you have on the hotter you will get. When summer comes and the humidity gets to your skin you want as little as possible on your face. My favorite foundation is the Covergirl Stay Fabulous 3-in-1 Foundation. This product as gotten rave reviews from beauty experts everywhere including myself! I cover amazingly and the wear time is incredible. It is also a matte foundation with is not only excellent for oily skin but for the summer in general! The dewier the foundation the sweatier you look. I recommend this foundation for anyone and everyone and it's cheap. Around $12!
Setting Spray is a must! I never realize how amazing these hidden gems can be. They help to set everything quickly so that when you hit the heat, nothing moves. Everything stays put and stays fresh. Urban Decay has a fabulous line of setting sprays. There are three different ones and the one I have tried and LOVED, is the All-Nighter Spray. The cool thing about this product is that when your skin temperature rises, it cools your makeup to avoid it from moving all over the place. It's like a thermostat for your skin!
If setting spray is out of your budget or you deem it unnecessary, then you want to set with a powder instead. It works as a blotting sheet, keeping the skin matte and absorbing oils as the heat rises. My favorite is the e.l.f Tone Correcting Powder. The has 4 shades that you mix together to combat redness, dark spots, etc. And it runs for about $3 which
is a steal!!!!
If you need you full-on eye makeup, I suggest a gel eyeliner for both eyes and eyebrows, yes I said eyebrows. Let me explain, gel eyeliner is usually waterproof, sweat proof and smudge proof! That means when the mercury rises, you can count on fabulous eyebrows. The trick with this is to get a brown gel liner and use it with a brow brush. Start application from the middle of the brow and work the product through. Don't re-dip, a little goes a long way. This a great way to make your brows last all day. My favorite on for brows is the Femme Couture Gel Liner in Brown. This formula is a bit dry which makes it ideal for getting the brows right. It helps avoid a application overload. My favorite for eyes is Essence Gel Eyeliner in Midnight in Paris. The formula is creamy and it wears all day, even through the sweat! This is one of my favorites and I use it everyday!
I am a mascara junkie, Que Youtube video called "I am a makeup junkie!" and I never leave my home without it! But when the heat starts, so does the meltdown. That's when I use waterproof mascara. I personally only use it on the bottom lashes because my sweat usually accumulates down under my eyes. I use the Maybelline Mega Plush in Black-Brown.
Finally, keep those lips luscious with they help of a stain. Stains really give the lips the color they need without being too preachy. And they usually last a good couple hours. I love the OCC Lip Tar in Divine. I did a few review of these last week so check it out for details.
Now come the hair. The worst thing is a hot, oily, greasy mess of hair. For the oily hair i suggest a dry shampoo. These bad boys don't replace washing but they can help your hair look cleaner when you are in a jam. They spray out a powder that helps absorb all the oils and help the hair look fresh!
For the frizz i suggest a freeze zapper like the One 'n' Only Brazilian Tech Frizz Wand. This has a mascara wand that will help take the frizziest strands. Keep it in your purse for those frazzled moments.
Well, That's it! I hope these tips will help keep you looking fresh and sexy for the rest of the summer! Do you have any summer tips to share? Comment Below!
Have a fantastic week Loves!
Love
Sarah XXO
Hope y'all had a fabulous weekend and are ready to start a new week! My weekend was super dramatic as my car caught fire on the highway yesterday as I was on the way to the beach. Super maddening, saddening and so cry worthy it's not even funny. But as Liz Taylor would put it, "Pour yourself a drink, Put on some Lipstick, and Pull Yourself Together'. That is precisely what I plan on doing this week. I will be busing it for a while, which means I'm going to be standing in the hot sun waiting for my wheels to work. Ick! So, what I need is a summer hair and makeup survival guide but since no such thing exists I compiled a few things that may help myself, and my beautiful readers, not to melt like a Popsicle when you hit the summer air. I am going to start with some of my favorite sweat-proof makeup items and then move on the hair. Keep in mind that some of these products may not be budget friendly but they get the job done! I am a heavy face sweater and I need products that can handle the job. So, let's get started...
 |
| Benefit Stay Flawless Primer |
 |
| Covergirl Stay Fabulous Foundation |
when my face gets slick. I also need something light-weight that has good coverage. I have alot of hyper-pigmentation and acne scaring and I need something that will cover that so I don't need alot of heavy concealer. The more you have on the hotter you will get. When summer comes and the humidity gets to your skin you want as little as possible on your face. My favorite foundation is the Covergirl Stay Fabulous 3-in-1 Foundation. This product as gotten rave reviews from beauty experts everywhere including myself! I cover amazingly and the wear time is incredible. It is also a matte foundation with is not only excellent for oily skin but for the summer in general! The dewier the foundation the sweatier you look. I recommend this foundation for anyone and everyone and it's cheap. Around $12!
 |
| Urban Decay All-Nighter Setting Spray |
 |
| E.L.F Tone Correcting Powder (Sorry about the broken part |
is a steal!!!!
 |
| Essence Gel Liner and Femme Couture Liner |
 |
| Maybelline Mega Plush Waterproof Mascara |
I am a mascara junkie, Que Youtube video called "I am a makeup junkie!" and I never leave my home without it! But when the heat starts, so does the meltdown. That's when I use waterproof mascara. I personally only use it on the bottom lashes because my sweat usually accumulates down under my eyes. I use the Maybelline Mega Plush in Black-Brown.
 |
| OCC Lip Tar |
 |
| Refresh Dry Shampoo |
Now come the hair. The worst thing is a hot, oily, greasy mess of hair. For the oily hair i suggest a dry shampoo. These bad boys don't replace washing but they can help your hair look cleaner when you are in a jam. They spray out a powder that helps absorb all the oils and help the hair look fresh!
 |
| De-frizz Wand |
Well, That's it! I hope these tips will help keep you looking fresh and sexy for the rest of the summer! Do you have any summer tips to share? Comment Below!
Have a fantastic week Loves!
Love
Sarah XXO
May 22, 2013
What Does This Comb Do? A List of Basic Combs and What Each One Does.
Hey Dolls,
How is everyone doing on this fine hump day? Good I hope. Hump day is usually the light at the end of the tunnel when we realize that the weekend is near so that usually settles it as a 'happy' day. I had a big day and I must say I am exhausted! Yawn. But I am trying to be more consistent with my blog post so here I am, plugging through to write this blog post for y'all! ;)
So, let me set the mood for you. You walk into your favorite beauty supply store to grab a comb for your purse. You walk by tons of glorious nail polish and drool. Then comes the hair color and you find yourself thinking of what do color your hair next. Moving on you catch a whiff of a lovely smelling shampoo and then you finally hit the combs section. All you want is a small pocket comb but you are confronted with comb after comb and you have no idea what each one does. That's why I'm here! Here is a few of the most common combs and what each one does.
Wide Tooth Comb
 This comb can come with or without a handle and usually sports long quite spaced out teeth. These usually come in plastic and sometimes wood. This comb is usually used to free large loose tangles. Another common use is for distributing conditioners or other treatments through out the hair. Alot of people use this comb to detangle while in the shower or use it to comb through wet hair. This comb can be used on pretty much any hair type.
Detangler
 This comb usually features two rows of teeth. The teeth are close together so that little hair gets through without detangling a knot. This kind of comb is usually used to detangle tighter knots and usually causes less damage. This comb is best used in wet hair in combination with a detangling spray. This comb is best used in thicker hair types.
Tail Comb or Rat Tail Comb
 This combs usually feature close together, fine teeth with a long tapered pick on the end. These combs are used to smooth and part hair when styling. The comb side can be used to smooth and tease hair. The pick is used for anything from parting hair to foil highlights. Some tail comes feature a metal pick for highlights. This comb can be used on all hair types.
Flipside Comb
 This has to be goofiest looking comb around but this thing is a one-tool wonder. It features teeth used to tease, smooth and detangle. The end features a pick comb which can be made of either dipped metal or plastic prongs. This is the ultimate styling comb!
Pick Comb or Afro Pick
 This comb features a large vertical handle with long downward teeth. These are usually made of plastic. A common misconception on these bad boys is that they are meant for Afro type hair styles. WRONG! These can be used to add height to anyone's hair.
Teasing Comb
 These combs can have many different features. Most have a long tapered pick similar to that of a tail comb. They sometimes feature three rows of teeth that can either be made of plastic or boar. Sometimes the teeth just vary in height. These are used to tease the hair and add volume. Any form of teasing can cause breakage so only use these on healthy, strong hair.
So, there you have it. Some basic comb types and what they do. There are many variations of each comb so they may look different than the ones shown above. I will post a brush directory in a few days so stay tuned. If you have any questions about any of the combs shown or have a question about a comb not shown please leave a comment below and I will try my very best to answer your request. Thank you all for reading and see you soon!
Love,
Sarah
How is everyone doing on this fine hump day? Good I hope. Hump day is usually the light at the end of the tunnel when we realize that the weekend is near so that usually settles it as a 'happy' day. I had a big day and I must say I am exhausted! Yawn. But I am trying to be more consistent with my blog post so here I am, plugging through to write this blog post for y'all! ;)
So, let me set the mood for you. You walk into your favorite beauty supply store to grab a comb for your purse. You walk by tons of glorious nail polish and drool. Then comes the hair color and you find yourself thinking of what do color your hair next. Moving on you catch a whiff of a lovely smelling shampoo and then you finally hit the combs section. All you want is a small pocket comb but you are confronted with comb after comb and you have no idea what each one does. That's why I'm here! Here is a few of the most common combs and what each one does.
Wide Tooth Comb

Detangler

Tail Comb or Rat Tail Comb

Flipside Comb

Pick Comb or Afro Pick

Teasing Comb
So, there you have it. Some basic comb types and what they do. There are many variations of each comb so they may look different than the ones shown above. I will post a brush directory in a few days so stay tuned. If you have any questions about any of the combs shown or have a question about a comb not shown please leave a comment below and I will try my very best to answer your request. Thank you all for reading and see you soon!
Love,
Sarah
May 11, 2013
Coconut Oil Love
Hey Everyone,
 I know I have been MIA for a while and I am so sorry to all my subscribers and regular readers. Life has been exceptionally crazy this last little while but things have slowed down alot with work and such. My Dad was admitted into a long term care facility a while back and we have just been getting used to the idea and how to work our schedules around it and everything. Work was really crazy for a while but we hired a second worker and now my hours got sliced in half so I have a bit more time on my hands.
Anyways, enough with my babbling and on to Coconut Oil. I have heard countless good things about this "miracle" oil through pinterest, television and other sources so I obviously needed to try it for myself. I went to a bulk store near my work and picked it up for about $7 CAD. Some of the claimed presented are:
-Hair Growth
-Skin Care
-Weight Management
These are the three categories with subcategories ranging from long hair to moisturized hair, Blemish Control to eye makeup remover, Speeding metabolism to diabetes management. I only purchased the oil yesterday so I haven't really been able to give it a good try as of yet but I did get a chance to test a few things.
Last night I washed my hair but skipped the conditioner, then after towel drying my hair I took some of the solidified oil in my hand and ran it through my hair, scalp to end. After I was done distrubing the oil I wrapped my hair in a turban towel. Left it in for about an hour while I watched tv. I rinsed it out without shampoo before hitting the sack. When I woke up my hair was a hot mess let me tell you. The oil was still clinging to my hair as in it looked wet. So, I jumped in the shower and washed with shampoo and it came out clean. My hair does seem alot shiner and lusty. I mainly bought it for the hair growth claims so I will let you know. I plan on doing things a bit differently next time though. Perhaps not washing my hair, putting the oil in and then washing it out with shampoo in the morning. This may work a bit better.
Another claim I was reading last night was that it can heal and prevent cavities. Now I do not have dental benefits and I will try anything to help me avoid going to the dentist. I know I have a few cavities and some bad ones that need to be pulled but I can't afford any extractions right now so I will try whatever I can. Anywho, I decided to do a dental pulling which basically consisted of my swishing melted coconut oil around my mouth for 10 minutes, spitting and then rinsing. I haven;t noticed the benefits yet because I have only attempted this once but I do plan on doing this atleast twice a week so we shall see what result come on it. So, far that is all I have had a chance to try but I will try some other stuff too and write an update blog in a few weeks. :)
Please give me any tips and tricks you may have involving coconut oil!
P.S- This stuff taste great and very pure. Make sure you get virgin coconut oil this stuff can be used for cooking and baking along with your beauty needs! Double Wammy! Also, Please take a moment to answer my poll about what you use coconut oil for! D Thanks in advance.

Anyways, enough with my babbling and on to Coconut Oil. I have heard countless good things about this "miracle" oil through pinterest, television and other sources so I obviously needed to try it for myself. I went to a bulk store near my work and picked it up for about $7 CAD. Some of the claimed presented are:
-Hair Growth
-Skin Care
-Weight Management
These are the three categories with subcategories ranging from long hair to moisturized hair, Blemish Control to eye makeup remover, Speeding metabolism to diabetes management. I only purchased the oil yesterday so I haven't really been able to give it a good try as of yet but I did get a chance to test a few things.
Last night I washed my hair but skipped the conditioner, then after towel drying my hair I took some of the solidified oil in my hand and ran it through my hair, scalp to end. After I was done distrubing the oil I wrapped my hair in a turban towel. Left it in for about an hour while I watched tv. I rinsed it out without shampoo before hitting the sack. When I woke up my hair was a hot mess let me tell you. The oil was still clinging to my hair as in it looked wet. So, I jumped in the shower and washed with shampoo and it came out clean. My hair does seem alot shiner and lusty. I mainly bought it for the hair growth claims so I will let you know. I plan on doing things a bit differently next time though. Perhaps not washing my hair, putting the oil in and then washing it out with shampoo in the morning. This may work a bit better.
Another claim I was reading last night was that it can heal and prevent cavities. Now I do not have dental benefits and I will try anything to help me avoid going to the dentist. I know I have a few cavities and some bad ones that need to be pulled but I can't afford any extractions right now so I will try whatever I can. Anywho, I decided to do a dental pulling which basically consisted of my swishing melted coconut oil around my mouth for 10 minutes, spitting and then rinsing. I haven;t noticed the benefits yet because I have only attempted this once but I do plan on doing this atleast twice a week so we shall see what result come on it. So, far that is all I have had a chance to try but I will try some other stuff too and write an update blog in a few weeks. :)
Please give me any tips and tricks you may have involving coconut oil!
P.S- This stuff taste great and very pure. Make sure you get virgin coconut oil this stuff can be used for cooking and baking along with your beauty needs! Double Wammy! Also, Please take a moment to answer my poll about what you use coconut oil for! D Thanks in advance.
April 20, 2013
Curling Wands 101
Hey Everyone,
I know that I have not posted in a while but I have been vlogging alot lately. Check out my latest video all about curling wands. Also share it with your friends! :D
I know that I have not posted in a while but I have been vlogging alot lately. Check out my latest video all about curling wands. Also share it with your friends! :D
December 29, 2012
Winter Hair Survival 101
I'm back ladies and gents,
It has been a crazy last couple of weeks! Between work, events, dinner and family life has been pretty cray cray. Let me fill you in on a few life details before we get started on our winter hair survival. First off, Work...let me tell you, when I chose retail as my "career" I obviously wasn't thinking about how xmas time would be...Holy moly! I think it was the craziest Ive seen it. One Sunday my self and co-worker couldn't get away from the cash register for two minutes. It was 5 hours straight of pure chaos! On top of a hectic work schedule, almost ever weekend i have had an invite somewhere (Not bragging, just saying because it never happens). I even had to turn a few invites down just because I need rest. I have work the last 5 Saturdays in a row so having today off is a treat. I thought I would take advantage and write a blog post since my post have been few in the last little while. So let's jump right into it...
WINTER HAIR SURVIVAL!!!!!! (read with a loud amplified voice)
Here are a few tips to keep your hair looking gorgeous through out the winter months.
A side note:
A couple of my friends have a band and they hosted an event last night which I attended. Here are two pics from the event.


It has been a crazy last couple of weeks! Between work, events, dinner and family life has been pretty cray cray. Let me fill you in on a few life details before we get started on our winter hair survival. First off, Work...let me tell you, when I chose retail as my "career" I obviously wasn't thinking about how xmas time would be...Holy moly! I think it was the craziest Ive seen it. One Sunday my self and co-worker couldn't get away from the cash register for two minutes. It was 5 hours straight of pure chaos! On top of a hectic work schedule, almost ever weekend i have had an invite somewhere (Not bragging, just saying because it never happens). I even had to turn a few invites down just because I need rest. I have work the last 5 Saturdays in a row so having today off is a treat. I thought I would take advantage and write a blog post since my post have been few in the last little while. So let's jump right into it...
WINTER HAIR SURVIVAL!!!!!! (read with a loud amplified voice)
Here are a few tips to keep your hair looking gorgeous through out the winter months.
- Deep moisturize 1-2 times a week. This is my first tip because it's the most important. I always deep moisturize whether it's summer or winter because I am not very good to my hair. Not only is it all bleached underneath but there is always layers upon layers of hair color. Then there is heat styling. I do not blow dry my hair if I can help it but I am attached to my flat iron and curling tools. So, this is a crucial step for me. Doing so in the winter will help keep the elasticity in your hair and give it shine. The trick to deep moisturising is patience. You want your deep conditioner to really penetrate into the follicle. I leave my mask on for around 5-7 minutes, but that is the minimum. You can also leave it on for 20- 1hour. The longer the better!
- Brush with a paddle brush or boar bristle brush. Making sure your hair is brushed it a good idea too. With the harsh winds in the winter time, cold hair dries out the hair causing more breakage. If you keep your hair tangle free, it's means let breakage when attempting to detangle hair. Alot of people opt for a boar bristle brush. Boar brushes usually sport softer, more dense bristles. These help polish the hair and have a less damaging effect. I do not recommend boar bristle brushes for people with fine hair, it will cause static electricity...buzzzzzzz!
- Comb wet hair with a wide tooth comb. Alot of people like to brush through wet hair with a paddle brush. I do not recommend this because this causes more tangles and will break the hair. Using a wide tooth comb lets you gradually comb through the hair. If the hair is conditioned properly, this should be done with ease. If you must use a brush to detangle after a shower, I would opt for a small vent brush. These are brushed used for blow drying hair, so the bristles are more spaced out, having the same effect as a wide tooth comb.
- Condition every time you wash. Alot of people like to skip the conditioner in the shower due to overly productive oil glands, etc. But I would still opt for conditioner during the winter months. I never condition my roots, but I always condition my ends. These take the most beating and I like to keep them well moisturized.
- Wear a hat. Wearing a hat with protect your hair from all the harsh elements that can damage your hair further. There are so many cute styles out there...why not wear a hat?
- Wear your hair up at night. It like to loosely tie my hair in a bun when I hit the sack at night. This helps keep my long locks tangle free and prevents spit ends.
- Use a silk pillow case. I like to use a silk pillow case because it keeps my hair from splitting. I never used a silk pillow case before and now that I have for about 2 years now, I'm hooked. When I need to wash it and put on another pillow case, I notice the different right away. A silk pillow case allows the hair to glide across the case and doesn't tug or pull at the hair. Using a silk pillow case is also good for you skin because it doesn't tug or pull at the skin which can cause wrinkles to develop faster.
A side note:
A couple of my friends have a band and they hosted an event last night which I attended. Here are two pics from the event.


So that's it. Had a blast and they did an amazing job. Have a fantabulous weekend and see u all soon!
November 01, 2012
Makeup Photoshoot: Dita Von Tease
Hey BQ's,
It's me again and this time it's just to show you a makeup tutorial that I tried! It's very exciting because it's the first makeup tutorial I have ever attempted. It was a makeup tutorial off of a channel I am subscribe too called Pixiwoo. It is an excellent channel that follows two British ladies who are both makeup artists. Their tutorials are amazing and I can't wait to try more. Anyways, for your reference, is the video that I followed.
Ofcourse her makeup looks immaculate! But this was my attempt.


 Not bad in my opinion. Those were some of my best shots but there are a crap load more on my facebook page. The OBQ on Facebook This look was relatively easy to do, the only thing I can say is that in the video they are using really high-end products (they are makeup artists...DUH!) and most of my products were drugstore varieties.
Anyways, that's that. I uploaded a new Youtube video all about this post and what not so check it out and don't forget to subscribe. The OBQ on Youtube
Thanks a bill guys! Muah! X
It's me again and this time it's just to show you a makeup tutorial that I tried! It's very exciting because it's the first makeup tutorial I have ever attempted. It was a makeup tutorial off of a channel I am subscribe too called Pixiwoo. It is an excellent channel that follows two British ladies who are both makeup artists. Their tutorials are amazing and I can't wait to try more. Anyways, for your reference, is the video that I followed.
Ofcourse her makeup looks immaculate! But this was my attempt.


Anyways, that's that. I uploaded a new Youtube video all about this post and what not so check it out and don't forget to subscribe. The OBQ on Youtube
Thanks a bill guys! Muah! X
August 02, 2012
Braids, Braids, Braids
They are everywhere! Braids in buns, pigtail braids, braided ponies and even braided faux hawks. It certainly looks like braids are the trend of the summer and I defiantly think this trend with head off into the fall and winter. I personally love this look and frequently rock it. My favorite way to wear a braid is in my bangs, kind of like a headband. I love this look with soft curls or waves.
Let's examine different types of braids and how you can pull them off.
First off, let's look at the classic french braid.


The dutch braid is basically a reversed french braid. I also love this look in my bangs. It's alot of fun adding this braid to a bun or pony tail. Love!
Next...

The fishtail braid is a two strand braid and achieved by taking pieces from one side and crossing it over and then doing the same for the opposite side. It does take some time to do but it will be worth it when it's done. I love this braid for a day at the beach or even for a shopping day. It also looks super cute topped with a hat.
And finally...

Lauren Conrad is the queen of the braided bang and I have fallen madly in love with it myself. I love it because it's just a cute way to get your bangs out of your face. Again, this could be added to an updo.
So, that is it for now Beauty Queens. I'm going to try and post a few vlog tutorials on how to accomplish each braid. Like I said, I am certain that this trend in going to stick through the fall/winter months.
What do you think of the trend? Do you have any particular braided styles you like to rock?
Ta-ta for now BQ's.
xoxo
Sarah
Let's examine different types of braids and how you can pull them off.
First off, let's look at the classic french braid.
The french braid a three strand braid and is fairly simple to accomplish. I usually do a french braid in my bang, which we will examine later. I love this look and would say I do it most often. I also love the idea of french braids Incorporated into an updo. It add that x factor but still looks chic an polished.
Moving on...

The dutch braid is basically a reversed french braid. I also love this look in my bangs. It's alot of fun adding this braid to a bun or pony tail. Love!
Next...

The fishtail braid is a two strand braid and achieved by taking pieces from one side and crossing it over and then doing the same for the opposite side. It does take some time to do but it will be worth it when it's done. I love this braid for a day at the beach or even for a shopping day. It also looks super cute topped with a hat.
And finally...

Lauren Conrad is the queen of the braided bang and I have fallen madly in love with it myself. I love it because it's just a cute way to get your bangs out of your face. Again, this could be added to an updo.
So, that is it for now Beauty Queens. I'm going to try and post a few vlog tutorials on how to accomplish each braid. Like I said, I am certain that this trend in going to stick through the fall/winter months.
What do you think of the trend? Do you have any particular braided styles you like to rock?
Ta-ta for now BQ's.
xoxo
Sarah

May 02, 2012
Miracles & Piano Keys
Well, it's finally Wednesday, which means only two more days before the weekend, which gets me giddy. =D My post today is all about a new product I'm dying to share with you. My sister was in Ohio visiting some relatives last weekend and picked me up a new leave-in conditioner called Miracle 7. It claims to have 7 benefits:
 Did it work? I'll say. The first time I sprayed it in my damp hair, I noticed a huge difference. Let me explain, I have super damaged hair. I have bleached, colored (every color), flat ironed, curled and blow dyed the crap out of my hair. I have tried almost every product known and nothing has made my hair feel this way. I usually don't blow dry y hair, so after spraying my hair, I skooched into bed. When I woke up, my hair felt heavenly! Which is ironic because the bottle has angel wings around the '7' and it says 'for heavenly hair'. But seriously folks, I would recommend this to anyone. The down side? It's only available in the US. You can purchase it online too. I know most people do 'states side' shopping these days. So there is absolutely no excuse for you not to try this product. Buy a bottle for youy house, gym bag, beach bag, purse, whatever... I promise you won't be disappointed.
In other news, I painted my nails tonight. I did a white french tip and a piano key statement nail on my left hand. Check it --->

- De tangling
- Stops breakage
- Repairs dry and damaged hair
- Prevents split ends
- Seals and protects color
- Controls frizz and adds shine
In other news, I painted my nails tonight. I did a white french tip and a piano key statement nail on my left hand. Check it --->
What do you think? I think for a first attempt it wasn't bad.
Well, that's it for me folks. Enjoy your crazy or not so crazy weekend. Oh! Quick Question: Do you use leave-ins? Any favorites to share? The floor is yours.
Ta-ta for now!
xoxox Sarah
April 29, 2012
Cool Wax Review
 So, here is a question for all you lovely ladies. Have you ever pulled down the sun visor in your car, popped open the mirror and wondered why the heck you left the house looking that way? Oh! And when you in direct sunlight it's 10x worse! Well, when this happens to me, I usually see all my tiny baby 'stache' hairs. :| Gross right? Yeah, it's pretty hideous. I have been in search of something easy and affordable to wax my upper lip and chin. I don't want to invest in a wax warmer and crap if I'm only going to use it for my facial hair. Most of the time when I want something for facial hair it's all about hard waxes. And Hard waxes, let me tell ya, is the worst thing I have EVER used! It's messy and it hurts like a...well, you know. I find it breaks in little pieces and you have to rip each little piece off. I may as well pluck. There is also sugaring, which I haven't used. I'd like to try it, but it tends to be a little out of my price range. I came across this product called Cool Wax at my local Sally Beauty Supply. It requires no heating, it claimed to be easy and it wasn't (obviously) hard wax! It sounded pretty good. The wax it's self is about 8 bucks. It's not very big so it's perfect for facial hair. I had to buy the strips separately. For 25 full-sized strips and 10 spatulas it was about 5ish bucks. It came in a lavender scent and a cucumber scent. I chose the lavender scent because lavender is notorious for calming (which is beneficial when waxing lol). I had a good amount of facial hair (For any gents reading this, I'm sorry you had to see that. But we ladies get facial hair too). I opened the puck and right away I knew it was going to be a bit messy to work with. I dipped my spatula in and spread it on the area to be waxed. I took my pre-cut strip and popped it over the wax. After rubbing the strip a few times, I braced myself and ripped. So did it work? No! Not one hair! I then placed the strip on again. Rubbed and ripped. This time pulling much faster. This time I got a few. By the 3rd try, I had gotten it off. Although my skin was red and stinging a bit. It didn't get the peach fuzz, which isn't what bothers me about my upper lip anyways. So what's the final verdict? It wasn't horrible, which means I didn't hate it enough to return it. It's also water-soluble so it was easy to clean up. Would I buy it again? Probably not. It got the hairs off, but not enough to my liking. Would I recommend it to a friend? I doubt it. If your interested in trying the cool wax anyways, you can pick it up at Sally Beauty Supply.
 I think at the end of the day, I need to invest in a wax pot and start waxing more body parts. Ha ha!
Do you guys have any other suggestions as far as waxing is concerned? Have you found an easy and afford solution to your hair situation? Hit up the comments Beauty Queens.
xoxo Sarah
April 13, 2012
New Hair
Hey Everyone,
Hope every ones week went well. That being said, I hope we all have a stellar weekend. :) So, I am trying to put the finishing touches on my vlog all about the sock bun. Hopefully it gets done this week. I gave my two weeks notice in for my one retail job (So excited!), so hopefully I can focus more on the blog in my spare time. Anyways, my point is, I want to post my vlog post asap. I'm using my sister as a model and she is being a little difficult. Ha Ha! No, she's actually being a very good sport, but we have both been crazy busy. But I promise to have the vlog up by next week. So, the other day while blasting Sargent Peppers Lonely Hearts Club band by the Beatles and cleaning up my room, I looked in the mirror and realized that I needed a dye job and trim. So, I contacted my fab hairdresser at cutz to go and finally got it done today. Here are some pics:


Nice huh? Yeah, I love it too. :D This is the ombre look that seems so popular these days. I was going to darken it up but I happened to style it a certain way the other day and wanted to keep the ombre thing going on and I'm glad I did. Don't you love when you get your hair freshly done? Nothing boosts confidence levels more than a new 'do'.
In other news, I painted my nails (again!) I did the whole statement nail this time.

What do you think? The colors used where both china glaze. The solid blue is For Audrey and the sparkly one is a color from the Prismatic Collection called Optical Illusion. FYI The Prismatic Collection is available at Sally Stores now! They have some really gorgeous colors to choose from. For Audrey was a huge color last year. Every time I went to purchase it, they had sold out. It's a very fun color for summer.
 So, I have a few questions for you. What do you think of my hair? My nails? And the colors used? Oh, And will you be giving the Prismatic Collection a go? Hit up the comments Beauts :)
Hope every ones week went well. That being said, I hope we all have a stellar weekend. :) So, I am trying to put the finishing touches on my vlog all about the sock bun. Hopefully it gets done this week. I gave my two weeks notice in for my one retail job (So excited!), so hopefully I can focus more on the blog in my spare time. Anyways, my point is, I want to post my vlog post asap. I'm using my sister as a model and she is being a little difficult. Ha Ha! No, she's actually being a very good sport, but we have both been crazy busy. But I promise to have the vlog up by next week. So, the other day while blasting Sargent Peppers Lonely Hearts Club band by the Beatles and cleaning up my room, I looked in the mirror and realized that I needed a dye job and trim. So, I contacted my fab hairdresser at cutz to go and finally got it done today. Here are some pics:


Nice huh? Yeah, I love it too. :D This is the ombre look that seems so popular these days. I was going to darken it up but I happened to style it a certain way the other day and wanted to keep the ombre thing going on and I'm glad I did. Don't you love when you get your hair freshly done? Nothing boosts confidence levels more than a new 'do'.
In other news, I painted my nails (again!) I did the whole statement nail this time.

What do you think? The colors used where both china glaze. The solid blue is For Audrey and the sparkly one is a color from the Prismatic Collection called Optical Illusion. FYI The Prismatic Collection is available at Sally Stores now! They have some really gorgeous colors to choose from. For Audrey was a huge color last year. Every time I went to purchase it, they had sold out. It's a very fun color for summer.
 So, I have a few questions for you. What do you think of my hair? My nails? And the colors used? Oh, And will you be giving the Prismatic Collection a go? Hit up the comments Beauts :)
Hugs & kisses
Sarah
Subscribe to:
Posts (Atom)