Showing posts with label Rimmel London. Show all posts

November 29, 2013

November Favorites ♥

Hello my Beauties,
       Hope you all had a fabulous day. My day was quite long and eventful as I worked at my day job. Anywho, in light of there only being a few more days left to the month, I thought I would share my November favorites with you guys. I thought I would do it in a categorized fashion. So, let's get this show on the road.


Facial Cleanser - Cetaphil for oily and ACNE prone skin
This has by far been my favorite cleanser for the last few months. It is a really light product that helps absorb all the access oils on your skin why giving you a deep clean. It is also hypo-allergenic for those of you with sensitive skin. I picked this up for around $7 CAD at Walmart.


Moisturizer- Clean & Clear Morning Burst Gel Moisturizer
Although I do love my cetaphil cleanser, products targeting oily or acne prone skin tends to be drying as well. I always, Click here to read my review.
always, ALWAYS follow up with a moisturizer. This one in particular is light and non-greasy. It has a light and clean scent. It also has soothing components like cucumber and mango extracts, so it makes your skin feel super fresh.


Foundation- L'oreal True Match 
I cannot say enough good things about this awesome foundation. The one thing I love about it is how light weight if feels on my skin. It makes me feel like I am not even wearing foundation. The formula is also super blendable. They came in a ton of shades with warm and cool tones. I have been trying a few different foundations over the last little while but this one seems the most consistent and the color is bang on. I usually switch between this one and my Revlon Colorstay. Click here to read my review.


Setting Powder- NYC Smooth Skin Loose Face Powder
I have been in mad love with this beautifulness lately. I love this product, first off because it's translucent, and second because it really does smooth out the skin. It doesn't hurt that it's dirt cheap either. I usually apply this with the 'press and roll' technique of old Hollywood. This helps to minimize pores and give a smoother appearance to the skin.


Blush- Joe Fresh 'Pink'
This blush is just a gorgeous hot pink. This product is very pigmented and you only need a tiny bit to give off a load of color. The color goes nicely with my alabaster skin tone and makes me look flirty and flushed (That was uncomfortable lol).


Bronzer- Real Colors 'Pool Boy'
This bronzer is shimmery and light. Again, it works nicely with my alabaster skin tone and gives me some warmth.


Eyeshadow- Elf Palette in 'Brown?'
I am not really sure of the actual name of this palette, what I do know is this, I am in love with it. It is the best shadow palette that I own and this is a big dupe for the Urban Decay Naked Palette, but a fraction of the cost at a whopping $6 CAD. There a tons shades, with some shimmer and some matte. I do have my favorites but this whole palette is awesome.


Eyeliner- Lise Watier in 'Noir Brun'
I swiped this liner off my Mom like a million years ago and I have been in love recently. I have been having a brown eyeliner
moment because it makes my blue eyes pop. This one does not smudge and lasts forever on my eyes. I know this is a splurge product but it is a good product that won't disappoint.


Mascara- L'oreal Voluminous in 'Carbon Black'
This mascara a was a recommendation from my friend and makeup artist Nora. I have been searching for a mascara that does what this one does for what seems like forever. The formula is great and it really is super black. It gives length, fullness and lasts all day.


Lipstick- Rimmel London Kate Moss Collection in 103
This a great matte nude shade. It glides on nicely and doesn't leave your lips dried and cracked. I usually use this with a liner
a shade darker and blend inwards.

Well, that's it for this month my Loves. This was my first favourites blog post, what did you think? Should I do more? Lemme know Babelettes.

Until next time...


December 05, 2012

Flawless Foundation tips

Hello my Pretties,

            How are all my lovelies doing this evening? I hope your all having a fabulous week so far. I know I am still stuck in Saturday and the week can be quite the drudge when your mind is far behind in the weekend. All your thinking about is partying, relaxing and not working. Anyways, enough with the jibber jabber, let's get to tonight post. Tonight we are going to discuss tips on how you can get a flawless foundation look. I suffer with acne and I need an effective way to cover those zits, scars and pores. If you suffer from this type of skin or you are just willing to get some foundation tips, then this post if for you. I'm going to also tell you what products I use to get these result. This is just what I use, you may know of something that works better for your skin type, so keep that in mind.

Step 1 to flawless foundation is the prep! Some people don't think they need to prep their skin before applying foundation, but in all honestly, speaking as someone who use to skip this step, it is more important than you think. Clean, glowing and moisturized skin will give a seamless, smooth canvas to work on. I usually start by using a witch hazel astringent to tone the skin. This also removes surface oils that will get trapped an cause pimples. Then, I apply a facial serum to help minimize the appearance of scars and to control oils throughout the day. Finally, apply a moisturizer. This will prevent the skin from flaking and help with a smoother application of foundation. And that is it for the prep!

Here are the items I use to prep:
-Thayers Peach Witch Hazel
-Beyond Belief Facial Serum
-Clean And Clear Moisturizer

Step 2 is to prime the skin. Alot of people like to skip the primer as well. Primer fills in fine lines and wrinkles and pores. This gives a smooth appearance to the skin and also helps your makeup to stay in place longer. Trust me, I notice a huge difference when I forget to apply my primer.

Here are some primers I use:
-Smashbox primer
-Hard Candy Skin Perfecting Primer

Step 3 is to apply your foundation. I use a Sephora Pro Buffing Brush #62 to apply my foundation but you can use your hands or a makeup sponge to apply it too. I start with my forehead and work my way down my face. Apply it lightly, you can use concealer later where you need it. Make sure to blend the edges and don't forget your ears (yes your ears, the point of foundation is to even out your skin tone and you want your ears to match the rest of your face). Moving on...

I use Covergirl Clean Makeup for oily skin

Step 4 is to conceal. You only want to use concealer where you need it!!! I can't reiterate that enough, you want your makeup to be like a second skin, not a mask. I use two different concealers, one for bigger and harder to cover blemishes and the other for smaller blemishes and under eye circles. If you have heavy circles under eyes you can use a yellow tinted concealer and if you suffer from redness you can use a green concealer. Word to the wise about green concealer, make sure you blend well! Sometimes when its not blended properly you can see a green tint in certain lighting. Also make sure your skin is well exfoliated because the concealer can get stuck in dead skin making it hard to blend. I also use my #62 brush to buff in my concealer but you can also use your fingers or a sponge to apply.

Here are some concealers I use:
-Vichy DermaBlend Foundation Stick (Actually a full coverage foundation)
- Essence Cover Stick
- Paladio liquid concealer in mint

Step 5 in to seal your work. Finally your going to want to set your makeup with a powder. Alot of people use a translucent powder t set the makeup because it doesn't add any color to the skin. Some people use a pressed powder as well. Make sure when purchasing your powder that you aren't purchasing a powder foundation. This will only make your foundation appear cakey and thick.

I use Rimmel London Stay Matte pressed powder.

And that is it! I use these techniques everyday and I usually look pretty flawless ha ha! I have some serious acne these days and I have some before and after pix of my foundation to share with you guys. My face has seriously exploded in the last little while so please be kind. My face might freak you for 5 seconds ha ha!


Not Bad right?! Well, that my tips, do you have any foundation tips to share? Please do below!

Thanks for reading guys!


September 12, 2012

Intense Eye Shadow How-to

Happy Hump Day Everyone!

                       Yes, it's that huge hump that we have just made it over (considering that it's 1am). Pretty exciting that there is only 2 more days left until the weekend. Do you have a fancy party to go to or maybe a club this weekend with the girls? Why not try to intensify your everyday eyeshadow for a more dramatic look? I'm going to show you how. It's really sweet and simple really, all it takes is your favorite shadow and water, that's right...water. (PLEASE EXCUSE MY BLENDING (or lack thereof) I DID THIS SUPER QUICK TO SHOW YOU THE INTENSITY).

Most eye shadows will go on pretty shear until they are highly pigmented. You can mostly find highly pigmented shadows at higher end makeup stores, such as Sephora or MAC. These types of shadows go on more vivid than normal and are usually used for photos or movies. I am going to show you how you can highly pigment your own shadows. It's pretty basic really. All you want to do is dip your eyeshadow brush or sponge into water before swiping your shadow. The water thickens the formula and causes the brush to absorb more of the shadow. This results in a more pigmented shadow. I took a few pictures of a swipe using a wet brush and a dry one so you can see the difference. The wet is on the left and the dry is on the right. I have also captioned the brands and names of each shadow in case you were wondering. PLEASE NOTE: SOME OF THE SHADOWS NEEDED A FLASH TO SHOW UP IN MY LIGHTING. THEY ARE MUCH MORE VIBRANT IN REAL LIFE.

Rimmel Blue Eye colour palette - unsure of the name
Rimmel London Colour Rush - 021 Alluring

                                                  Sally Girl Baked Eyeshadow-Ladylike Lavender

Sally Girl Baked Eyeshadow - Pink Frosting

Sally Girl-Blue Marine
 
 
So, Pictures don't lie. See the difference in tone? It's pretty crazy huh? So, eyeshadow rule of thumb; For a sheer look, opt for dry shadow, for a bold, vivid look, dab your eyeshadow brush in water. This can also go for blushes and bronzers. Turn them into cream blush/bronzer by spraying them with water.Another trick; spray your matte black shadow with water and apply with an eyeliner brush. Instant liquid eyeliner. It's amazing what water can do. Well, that's it for now folks. Stay tuned because I plan on posting again tomorrow with a DIY and some nail art.


September 02, 2012

Bath and Body Works haul and more...

Hey hey everyone,

        Hope everyone's long weekend is off to a smashing start. What I love about the long weekend is that your like, 'dang! it's Sunday already. Oh, Wait! There's still Monday left!.' What have I been up to, you ask? Well, Last night I caught up with a local Ribfest (which was a-freakin-mazing), today I cleaned my car and went shopping, and tomorrow, I'm hitting up the beach. Yes, summer is almost done and it's gotta go out with a bang. Now, when I say 'bang' I mean 'spend all your money and don't give two-well you know the rest, a le Nicki Minaj. Yes, I have been burning bills like it's going outta style. This is bad when, well, it's all the money that you have until your next check.


       In light of such things, I wanted to share with you my haul, which consist of everything from, candles to jewellery. Let me begin with my most recent haul, which was my bath and body works haul that happened today. On the left you will get a glimpse of my haul. Ta-da! isn't it gorgeous?! And it smells amazeballs. I wanted to do a vlog post about my haul but doing vlogs is alot of work. You gotta look perfect and everything. This way I can look like a hot mess and still show you guys the goods. I going to list all of the stuff and describe it. Let's begin ladies and lads.

Bubble bath (Lavender Vanilla) $5 on sale- This is a bedtime bubble bath and I bought it at the last minute because i noticed it was only $5 (normally $15). I guess you could say it was an 'mpulse buy.' I am super excited to try it.

Concentrated Room Spray (Marshmallow Fireside) $5- It's only 1.5 oz but one spray fills the room. My bedroom is right above my neighbors kitchen, so I get there nasty food smells sometimes (fish is the worst, bleeek!). This caught my attention for that reason. The smell also made an impact. It really smells like an ashy, fiery smell and it has a hint of marshmallow sweetness. Yum! My room smells fab.

Mini scented candles (Cafe au lait, Sweet Macaron, French baguette) 3 for $6- These guys are too perfect. They are small enough to pic several scents and i honestly couldnt choose just one. The cafe au lait smells has a cinnamony, coffee-ish, vanilla scent. The Sweet Macaron has a vanilla berry scent and the french baguette smells like a sweet buttery bakery (if you can imagine).

Mini body lotion (Malibu heat) $2.50 on sale - This little lotion was regularly $5 and I got it for half price. It has a flowery light scent that's perfect for the beach. I was in love the moments I sniffed. aaaaahhhh...:)

My Favorite Product of the haul. Scented candle (Summer Boardwalk) $6.25 on sale - This guy is amazing. I don't even know how to describe the scent. It's like funnel cakes, sea spray and sun mixed into a candle. So fantastic. I look forward to setting this candle ablaze.

Now, all of that goodness came together at the grand total of $31.36. Not to shabby!


Next up...

Every year in Toronto we  have a thing called the Canadian International Exhibition. Basically, it's a national fair with shopping, food, a midway and shows. It's pretty much the highlight of my summer. They usually have a makeup booth with a ton of discounted drugstore makeup. I spent so little that I thought I'd share.

-NY.C eyeshadow palette for blue eyes
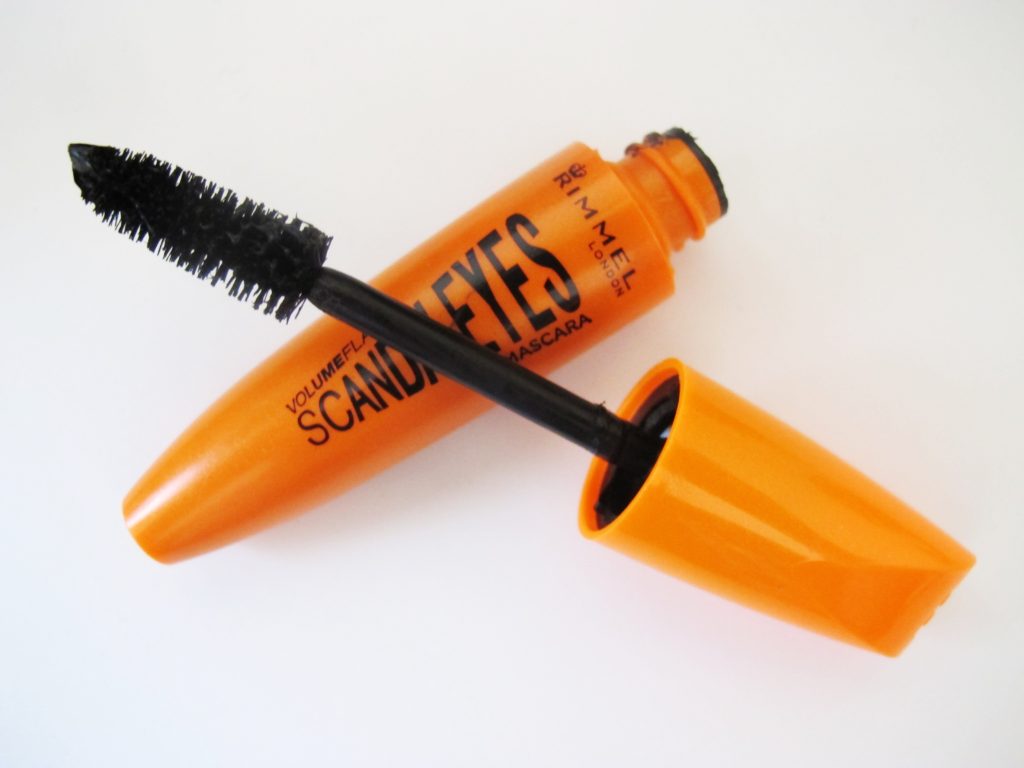
-Rimmel Scandleyes mascara in extreme black
w/ free black eyeliner
- Rimmel Stay matte pressed powder
- Rimmel sparkle it up eyeliner in purple

All of this came to a grand total of $11.30. Yeeeeuuuus! It was pretty amazing. The Ex is only on until tomorrow so if your in the T.O area, go check it out!

And Finally...

The is another local traditn that I have called the Ribfest. It basically a giant bbq. There are about 20 vender's who prepare ribs and pulled pork sandwiches. You vote and there is a winner crowned. The food is amazing. But the shopping is even better. I picked up an adorable Pandora bracelet for $30.
The price included 7 charms. These are the ones I got.

Fleur-de-lis- Mainly because it's a french symbol and I'm in love with France, like IN LOVE!

Martini- Doesn't speak for it's self?

Cat- I am a self proclaimed 'cat lady'. I have two.

Vanity- Well, if your going to  call yourself a 'beauty queen' wouldn't a vanity be vital?

Anchor- I have always had a fascination with anchors. Mainly because they rep sailors and pirates which I'm kinda obsessed with.

Starfish- Again, something to do with my sea fascination.

Eiffel Tower -Did I mention I was in love with France? :P

Well ladies and gents, That's my haul. I hope you enjoyed. Thanks again for reading.

Lots o' Love

Sarah


March 06, 2012

First EVER review!

Hey Beauty Queens,
         So, I’ve spent the last couple of days rummaging around my room for things that I have loved or hated to review for you guys. Going through drawers and looking through cupboards. I know this should come naturally but I really wanted to wet your appetites with something. So, after a few nights of searching I finally decided on a product. So, without further ado, I give you, drum roll please, my FIRST review ever! The product I have chosen for my first review is something that almost every woman uses, so I thought it would be a good starting point. It’s none other than SCANDLEyes mascara from Rimmel London. As I searched through my drawers and makeup box I saw this bright orange tube staring at me and I thought to myself ‘this stuff is amazing…I should review this’. So, here I am telling you that I give this product an A+ in the lashes department. Why did I love this product so much? Well, I have searched far and wide for mascara that plumps and lengthens. I am a tough customer when it comes to mascaras. I usually will fall in love with a mascara fast, but fall out of love just as quickly. So far, in my search for the perfect mascara, this one has been the most consistent. My lashes looked luscious, dark and long. The brush is larger than normal but it doesn’t have plastic bristles which, in my opinion, can cause lashes to look spidery and separated.  What didn’t I like about it? Well, the flake factor is high. Although I do dislike the goopy line you get on your eyelids from some mascara that claim not to flake, I don’t care for the black flaking either. The Verdict? I say despite some minor flaws, that it’s overall amazing mascara.  It does exactly what it promises and that is a mascara you can respect. I say go buy a tube next time you’re in need of a new mascara and I don’t think you’ll be disappointed.

I'm gonna trail off from the whole 'review' thing for a few. I have been keeping tabs on a youtube channel for the last couple months called cutepolish. If you haven't checked it out, you need to. She does some of the cutest nail designs around. My most recent fave it the tuxedo nails she recreated. Please check her out. :)


That’s all I’ve got for today guys. Hope you enjoyed my first post and I can’t wait for more to come. 
Hugs & Kisses
Sarah

P.S- I have applied the Gelish and I'm on day #3. No chips to report yet! :) Stay tuned for my review!

March 04, 2012

Working on it

Hey guys,
I am happy to annouce that I am working on my first blog post ever. I was going to post it today but my laptop died so I am blogging this from my Ipod he he! I am working on a review for a Rimmel london mascara and I spent a fortune on a new shellac-like product called Gelish. I will be posting some pics as well. This whole beauty blogging thing is actually exciting. It really makes me want to try new things so I can tell you guys how amazing/crappy products are. Also, part of blogging and exposing your feelings about certain things is constructive critism. Please feel free to comment on my posts if you share a differing opinion. People love to hear a variety of thoughts on a product. Anyways, Im off for now but stay tuned for upcoming reviews.

Love,
Sarah